")
")
Refactoring and running a Java application
Yet another post on the Eclipse Java Development Tools!
In the first post, we have seen how to create and configure a Java project, then how to create a basic Java application and, finally, we have seen advanced tips for Java development. Now it’s time to see how we can continue to improve our application with refactoring and how we can run our Java application in Eclipse.
4.1 - Generate getter, setter

In a Java application, you need a ton of getters and setters but it doesn’t mean that you have to write them by yourself. You can generate them very quickly either by using the code completion of by using the “Source” menu with the shortcut “Alt+Shift+S”. The “Source” menu also gives you the ability to generate several getters and setters at the same time.

Both solutions are generating code using the same code templates for setters and getters so do not hesitate to customize them as we have seen it before.
4.2 - Generate the constructor and much more
The “Source” menu contains a lot of options to quickly generate boring pieces of code. Using a method similar to the one used to generate getters and setters, you can easily generate a constructor in a few seconds thus you can create a data class from a simple class containing only a couple of fields. You could also generate other methods like “toString()”, “hashcode()”, “equals(…)” and much more. You can also change the code generated by configuring the code templates.
4.3 - Surround with…
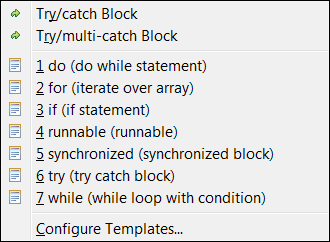
Among the features available from the contextual menu, one of my favorite is the “Surround With…” action. Thanks to the shortcut “Alt+Shift+z”, you can surround a selected piece of code with a code template. Among the code templates available, you can find “try… catch…”, “for…”, “if…”, “runnable…”.

If you want to create a new code template that can be used in the “Surround With…” action, you should use the variable “${line_selection}”.
4.4 - Rename

One of the most used refactoring tool of any self respecting IDE is the renaming. In Eclipse, you just have to use the shortcut “Alt+shift+r” and you will be able to rename all the occurrences of the selected element.
4.5 - Extract method

In order to improve the maintainability of your source code, you need to separate your method in smaller methods as they grow. You can do that very easily in Eclipse with the “Extract method” action. With the shortcut “Alt+Shift+m”, you can open a wizard letting you extract the currently selected code in a new method. Several other (less important in my mind) refactoring actions are also available from the “Refactor” menu. You can access them quickly with the shortcut “Alt+Shift+t”.
4.6 - Generate refactoring scripts

One of the first goal of an IDE is to automatize boring work and as such, Eclipse not only provides you with refactoring tools but it also records their use to let you create refactoring scripts. If you have to realize several refactoring actions on a bunch of classes, this can speed up you work.
4.7 - Paste Java source code as a new file
If you’ve found a piece of code that you want to integrate in your application, you can use a wizard to create a new Java class, choose its name and then paste the code in this newly created class or you can just select a package and paste your code directly. A new Java file will be created with a class, the package declaration will be written and with save actions you can even obtain the declaration of the imports easily along with formatting etc.
4.8 - Launching a Java application and favorites

Most of the time, in order to launch an application in Eclipse, you have to use a launch configuration. You can run your application thanks to the contextual menu available on a Java file, but you can also go configure manually a launch configuration. Thanks to the “Organize Favorites…” action or directly in the “Common” tab of your Java launch configuration, you can add a specific launch configuration to the list of your favorite ones. As a result, the launch configuration will be quickly accessible in the submenu of the run / debug / profile action of the toolbar.
4.9 - Launch configuration parameters
In our Java application, we are using some input parameters. In order to configure them in your launch configuration, you just have to use the “Arguments” tab.
4.10 - Saving a launch configuration on a file
When you are working in a team, you may want to share your launch configurations. As an example, all your team members need to launch the same tests suite with the same configuration. The “Common” tab of the Java launch configuration let you save the launch configuration in a XML file that can be easily shared in your version control tool. You just have to select a folder for the “Shared file” and a file named “<name of the launch configuration>.launch” will be created in this folder.
4.11 - Log in a file

One of the first way to find out more about an issue is to log some information in the standard outputs using “System.out.println(…)” or “exception.printStackTrace()”. Some issues may generate a lot of information and it may be very difficult to read any meaningful information in the console. The “Common” tab of the Java launch configuration lets you redirect the standard output to a file where it will be easier for your to process a very verbose log.
Next time we will conclude with some tips on debugging Java applications in Eclipse. Follow me on twitter if you don’t want to miss any update.